Create a minimal Android system for RISC-V
Chen Wang, 2020.11.24
After a period of hard work, we can now run an Android “minimal system” on QEMU of RISC-V.
The following is a brief summary of the current work. Although the road ahead is still long, there is something to have a look.
1. Requirement analysis
The full name of our project is “AOSP for RISC-V”, and all the source code is currently opened on github: https://github.com/aosp-riscv. The ultimate goal of our project is to port Android on RISC-V. Of course, this goal is huge.
But in the short term, we still have a small goal, which is described in one sentence: based on the RISC-V platform, realize the kernel part of Android running on QEMU, and run the Android Shell.
Based on the above objectives, the specific analysis is to realize a minimal Android system. The meaning of “minimal system” here is the so-called “bootable unix-style command line operating system”. In the traditional sense, a complete “minimal system” is described on the left side of the figure below. From bottom to top, the bottom is the hardware (note: hardware is not part of our “minimal system”). The first layer of software running on the hardware is the “Operating System Kernel”, and upon the OS kernel is the “C library”. Based on the C Library, we can build a minimal file system, which is essentially a bunch of command-line tools. These command-line tools must include at least a “init”, which is used to start the basic login shell in cooperation with the kernel, and one “Shell” is used to interact with users and call other tools and programs. With this “minimal system”, our big goal has a foundation.
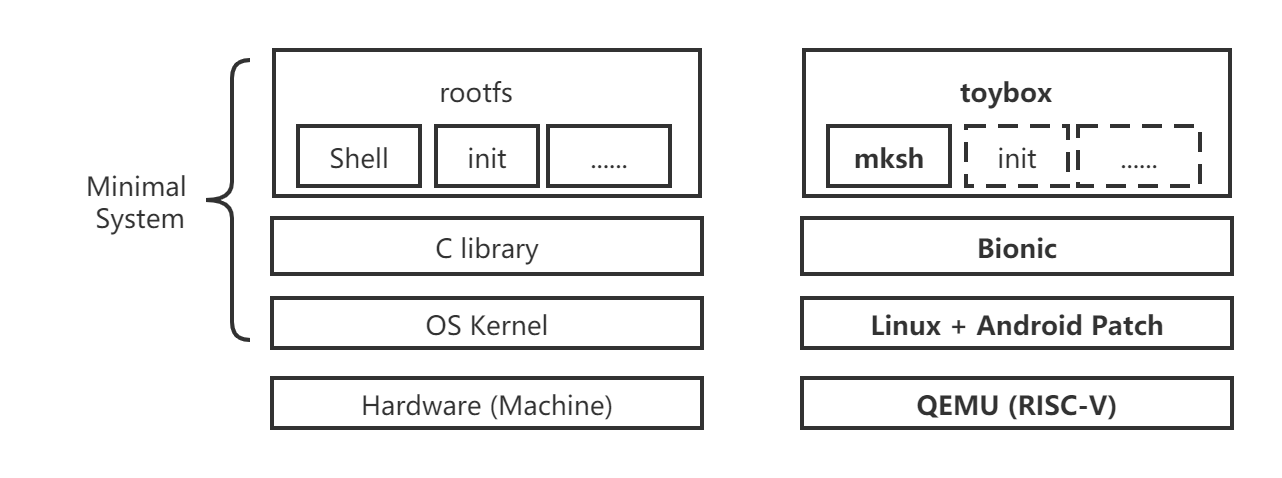
Through the investigation of AOSP, I roughly summarized the work we need to achieve as follows:
- Hardware part: Here we first use QEMU for RISC-V to simulate.
- OS Kernel: The kernel of Android uses Linux, of course, it has some patches of its own.
- C Library: Android has its own C library, which is bionic. It differs from the GNU C library (glibc) in that it is designed for devices with low memory and processor capabilities and running on Linux. It is released under the BSD license, rather than using the GNU public license like glibc.
- Root filesystem: Android has its own complex file system organization. As the goal of our experiment, what we need is the most streamlined and smallest file system. There is no need to transplant the complete Android system over, so I chose toybox to implement our various kind of command line tool. Someone may ask why we don’t use the more famous busybox. The reason is still related to the software license. Busybox uses GPL, while toybox uses BSD, which is more in line with Android’s appetite. Therefore, toybox is included in the source tree of AOSP, but busybox is not. In addition, I need to mention, because the implementation of toybox is very simple, the shell that provided by toybox does not work properly. Fortunately, Android already has its own official Shell, which is mksh, so we use mksh directly.
2. Introduction to porting work
The above talked about what needs to be done in the overall porting work. In fact, there are still many details in the specific implementation. Since our final goal (to transplant AOSP as a whole to RISC-V) is far from being achieved, I will briefly sort out what I have achieved so far, just for memo:
- Operating platform (hardware): currently adopt QEMU temporarily.
- AOSP version: tag based on
android-10.0.0_r39. - Toolchain environment: building of AOSP has been completely migrated to LLVM/CLANG, but GNU tools are still used in linking. Since the prebuild tool chain that comes with AOSP does not support RISC-V, I have to build my own LLVM/Clang and GNU-tools.
- Kernel porting: the kernel version I used tag
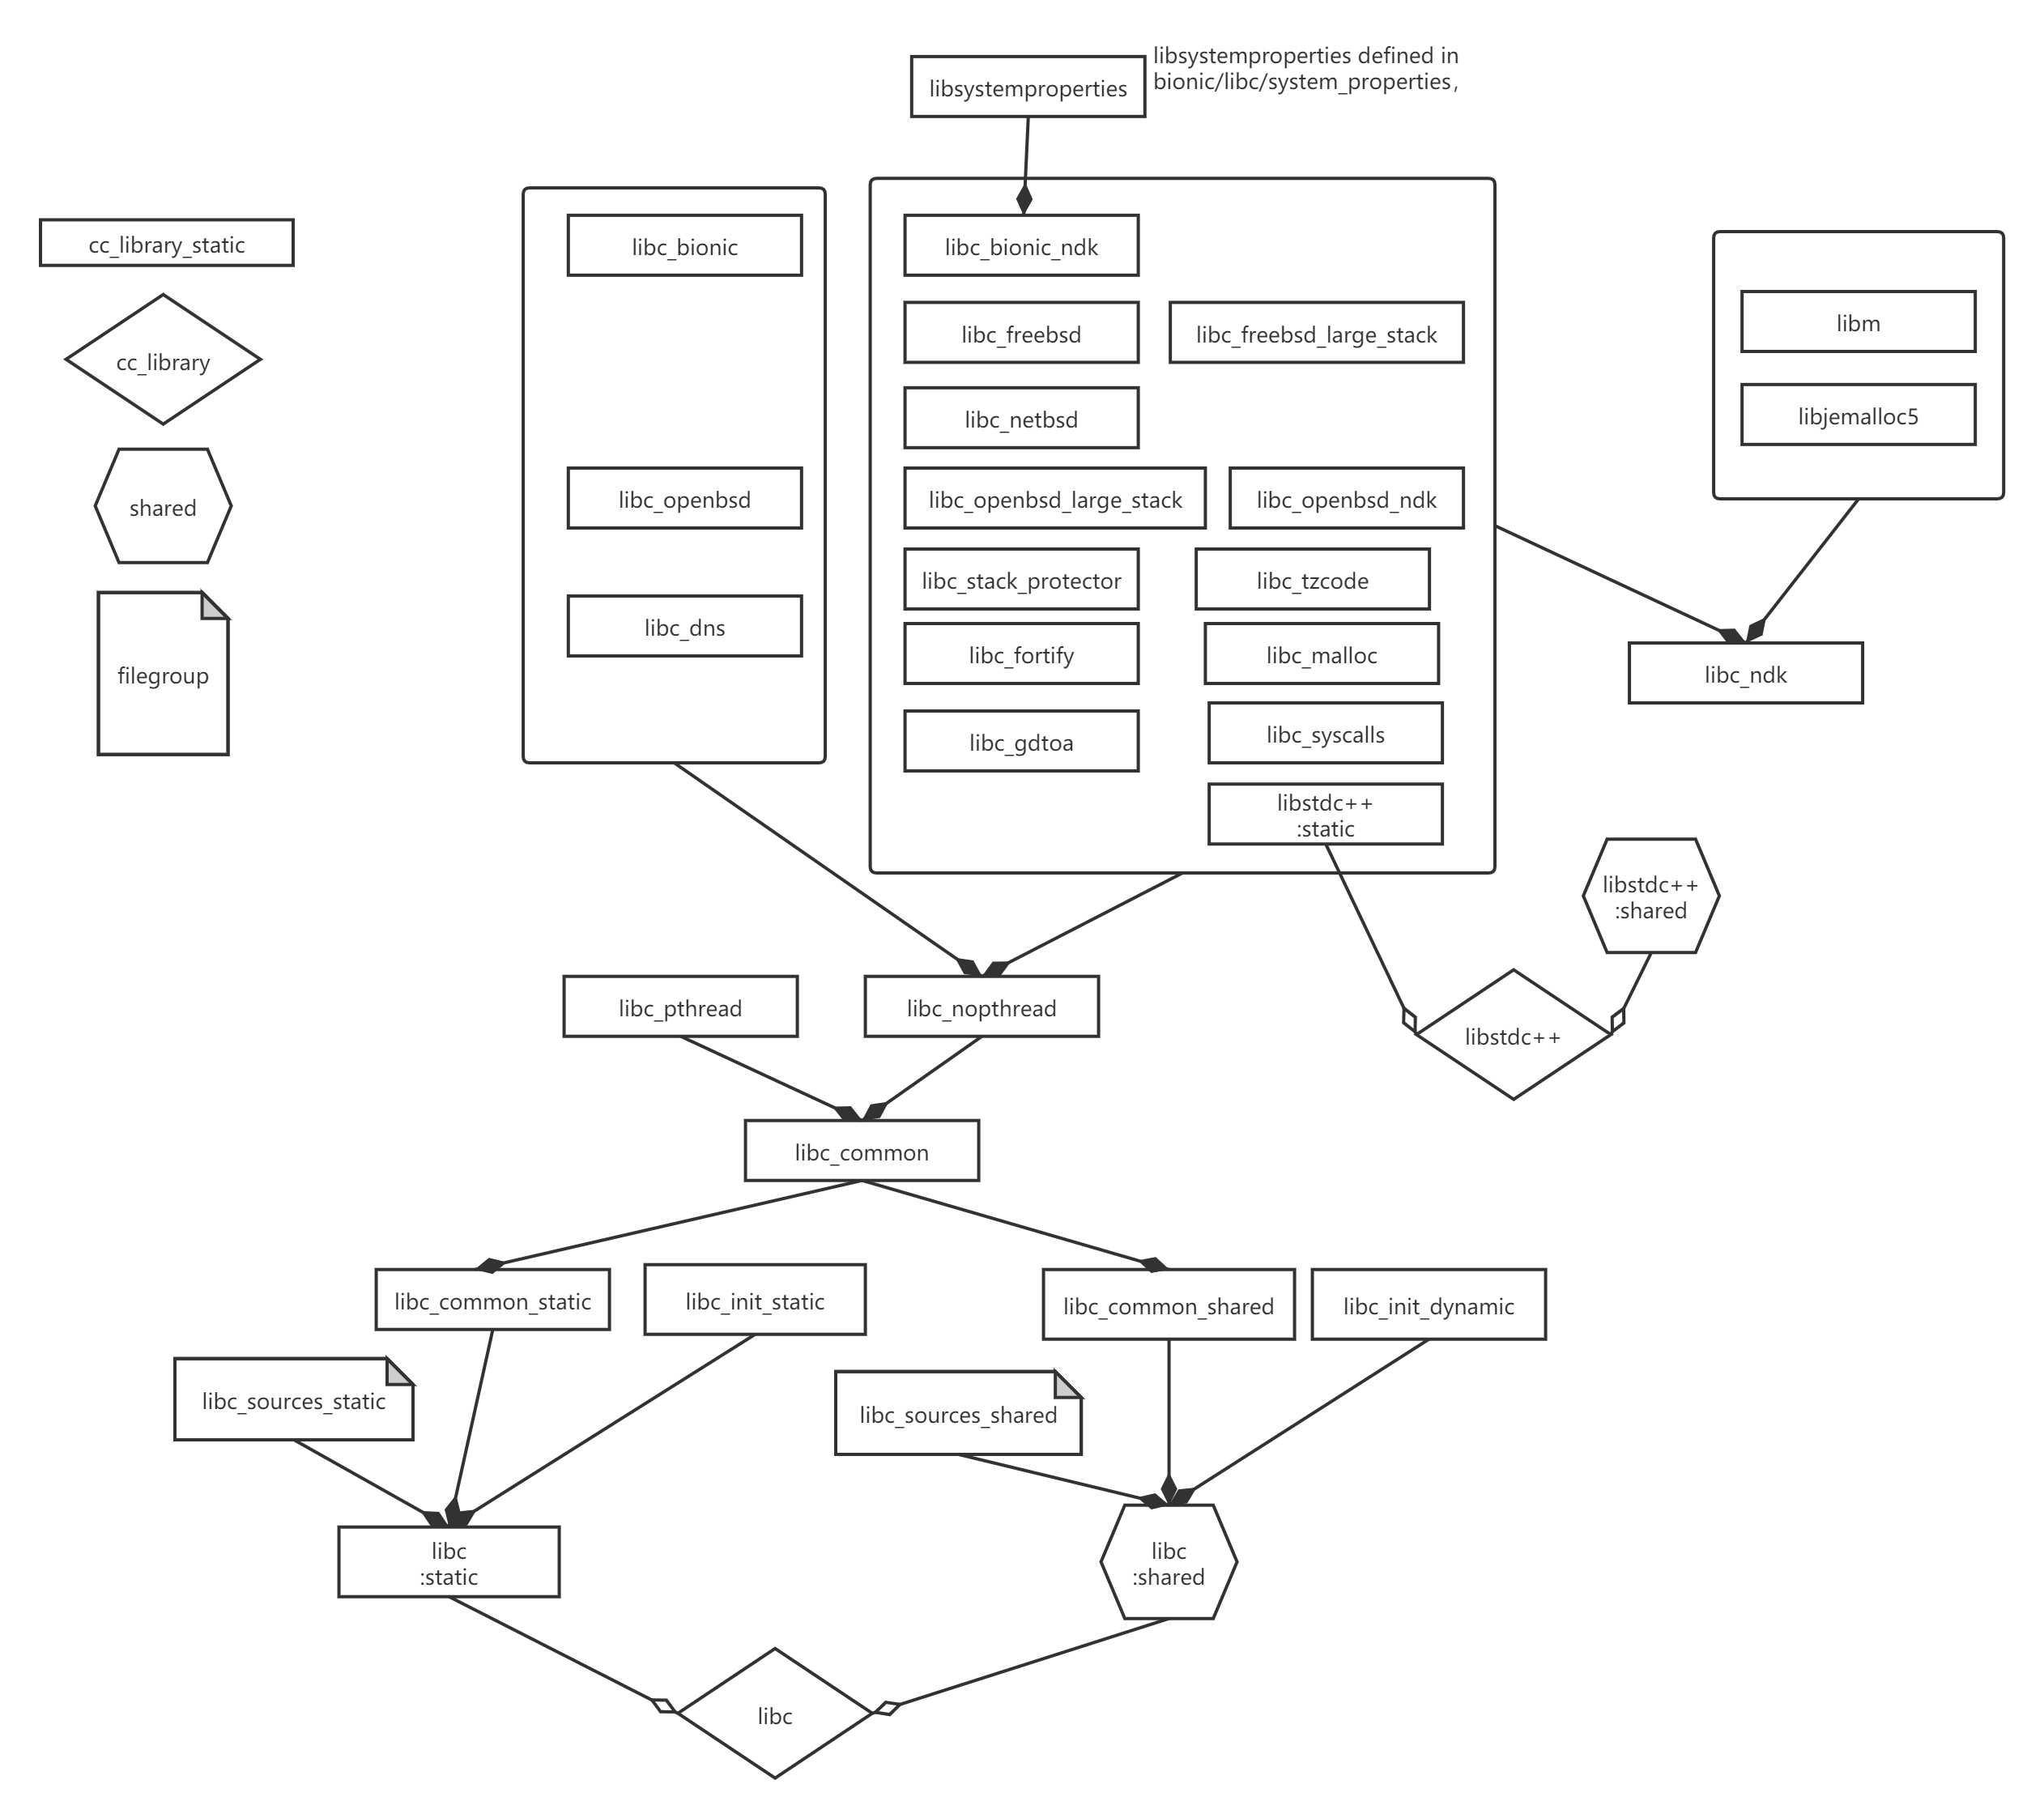
android-5.4-stablefor andorid common repository plus tagandroid11-releasefor configs repository. - The porting of the BIONIC library, as mentioned earlier, is based on the tag
android-10.0.0_r39too. Considering the requirements in first phase, only the static library of libc is implemented, the dynamic library of libc is not implemented, neither for libm/libdl/libstdc++/linker till now (but I will handle them soon later). In other words, the following executable programs such as toybox and mksh are statically linked. libc is the most important part of bionic, and the composition is quite complex. The main components and the dependencies between them are briefly summarized in following diagram:
- toybox: As mentioned earlier, it is based on tag
android-10.0.0_r39, but with a lot of tailoring. Because the toybox in Android includes many Android-specific features, such as SELinux and encryption, etc. In order not to involve too much effort in current phase, I disabled these functions and only retain some basic common functions. - mksh: The Shell looks relatively simple, just make sure there is no problem with the compilation.
- There is also a big work involved in the construction of the build system. I did not use the native Soong system that comes with AOSP, because in the pre-research process, I found that it is not easy to add a new ARCH from scrach in the existing AOSP build system (i.e. to use the traditional lunch + m). AOSP’s building system is too complicated and mature for existing ARCH that supported, but it is not friendly to latecomers. In order to reduce the risk and focus on the key areas in advance, I chose to use make and rewrite the makefiles for modules (bionic/toybox/mksh) that need to be ported. Of course, we still need to find a chance to move to AOSP Soong later, just let’s do it later.
3. Steps to make this minimal system
After some work, the above small goal has been initially completed, and at least one of the “minimal Android systems” we defined above can be launched on QEMU. The related porting and modification have been opened on github. Allow me brief following steps and you are welcomed to have a try and test, submit PR, or directly participate in our AOSP porting work.
3.1 Environmental preparation
The experiment is based on Ubuntu 20.04 LTS
$ lsb_release -a
No LSB modules are available.
Distributor ID: Ubuntu
Description: Ubuntu 20.04 LTS
Release: 20.04
Codename: focal
The software that needs to be installed in advance is as follows:
$ sudo apt install autoconf automake autotools-dev curl libmpc-dev libmpfr-dev libgmp-dev \
                  gawk build-essential bison flex texinfo gperf libtool patchutils bc \
                  zlib1g-dev libexpat-dev git \
                  libglib2.0-dev libfdt-dev libpixman-1-dev \
                  libncurses5-dev libncursesw5-dev
Then create a working directory riscv64-linux, the following operations are performed under this directory.
$ mkdir riscv64-linux
$ cd riscv64-linux
3.1.1 Building GNU toolchain
Download source code
$ git clone https://github.com/riscv/riscv-gnu-toolchainEnter the source directory:
$ cd riscv-gnu-toolchainNote that the main repository of clone above does not contain the contents of the sub-repositories, so you need to continue to update the sub-repositories. Note that the sub-repository of qemu is excluded first, because the complete download of qemu is too large; second, qemu is actually not needed for the toolchain compilation itself.
$ git rm qemu
$ git submodule update --init --recursive
Wait patiently for the sub-repository download to complete.
Note that due to I want to install the tools to /opt/riscv64, so sudo is required for make.
$ ./configure --prefix=/opt/riscv64
$ sudo make linux -j $(nproc)
Export the installation path of the toolchain. You can also write to the .bashrc file.
export PATH="$PATH:/opt/riscv64/bin"Test whether the toolchain is installed successfully.
$ riscv64-unknown-linux-gnu-gcc -vOutput similar to the following shows that the toolchain is compiled and installed normally.
Using built-in specs.
COLLECT_GCC=riscv64-unknown-linux-gnu-gcc
COLLECT_LTO_WRAPPER=/opt/riscv64/libexec/gcc/riscv64-unknown-linux-gnu/10.1.0/lto-wrapper
Target: riscv64-unknown-linux-gnu
Configured with: /home/u/ws/riscv64-linux/riscv-gnu-toolchain/riscv-gcc/configure --target=riscv64-unknown-linux-gnu --prefix=/opt/riscv64 --with-sysroot= /opt/riscv64/sysroot --with-system-zlib --enable-shared --enable-tls --enable-languages=c,c++,fortran --disable-libmudflap --disable-libssp --disable-libquadmath- -disable-libsanitizer --disable-nls --disable-bootstrap --src=.././riscv-gcc --disable-multilib --with-abi=lp64d --with-arch=rv64imafdc --with-tune =rocket'CFLAGS_FOR_TARGET=-O2 -mcmodel=medlow''CXXFLAGS_FOR_TARGET=-O2 -mcmodel=medlow'
Thread model: posix
Supported LTO compression algorithms: zlib
gcc version 10.1.0 (GCC)
3.1.2 Build LLVM/Clang tool chain
Make sure to return to the working directory riscv64-linux first.
After updating Ubuntu 20.04 LTS to the latest state, the software requirements for building llvm/clang should have been supported by default. Other tools needed in the compilation process are basically available on Ubuntu. If something is missed, please install it yourself.
Download the source code of llvm. The official source code repository is at github: https://github.com/llvm/llvm-project.
$ git clone https://github.com/llvm/llvm-projectAfter downloading, enter the root directory of the source code repository and check out the corresponding version. I choose thhe official release version 10.0.1-final and switch to the 10.x branch.
$ cd llvm-project/
$ git checkout release/10.x
$ mkdir build
$ cd build
$ cmake -G "Unix Makefiles" \
-DCMAKE_BUILD_TYPE=Release \
-DCMAKE_INSTALL_PREFIX=../install \
-DLLVM_TARGETS_TO_BUILD="RISCV" \
-DLLVM_ENABLE_PROJECTS="clang;libcxx;libcxxabi" \
-DLLVM_DEFAULT_TARGET_TRIPLE="riscv64-unknown-linux-gnu" \
../llvm
$ make -j $(nproc)
$ make install
Simply check the results of the installation.
$ ls ../install/ -l
total 20
drwxrwxr-x 2 u u 4096 October 9 11:37 bin
drwxrwxr-x 7 u u 4096 Oct 9 11:37 include
drwxrwxr-x 4 u u 4096 October 9 11:37 lib
drwxrwxr-x 2 u u 4096 October 9 11:37 libexec
drwxrwxr-x 7 u u 4096 October 9 11:37 share
Check the generated clang version:
$ ../install/bin/clang -v
clang version 10.0.1 (https://github.com/llvm/llvm-project.git ef32c611aa214dea855364efd7ba451ec5ec3f74)
Target: riscv64-unknown-linux-gnu
Thread model: posix
InstalledDir: ......
In order to directly enter clang on the command line to run the compiler later, add the path where the clang tool is installed to the PATH environment variable.
3.1.3 Build QEMU
Make sure to return to the working directory riscv64-linux first.
Download source code. We recommend the method of downloading the corresponding source code compression package directly according to the version number you need. This experiment uses the latest v5.1.0.
$ wget https://download.qemu.org/qemu-5.1.0.tar.xz
$ tar xvJf qemu-5.1.0.tar.xz
Note that the uppercase J is in the option when decompressing.
Compile and install. Enter the decompressed directory and perform configuration, compilation and installation. Note that I configure to install under /opt/qemu, so sudo is required for make install.
$ cd qemu-5.1.0/
$ ./configure --target-list=riscv64-softmmu --prefix=/opt/qemu
$ make -j $(nproc)
$ sudo make install
Export the installation directory of qemu to PATH and you can verify if the installation is correct:
$ qemu-system-riscv64 --versionAn output similar to the following indicates that qemu is working properly:
QEMU emulator version 5.1.0
Copyright (c) 2003-2020 Fabrice Bellard and the QEMU Project developers
3.2 Build Android kernel
Download Android kernel source code:
$ git clone https://android.googlesource.com/kernel/common
$ cd common
$ git checkout android-5.4-stable
Download Android kernel configuration. Besides the patches in the source code. Google has its own specific configuration for the Android kernel, so we need to add these configurations.
$ git clone https://android.googlesource.com/kernel/configs
$ cd configs
The key is to merge the Android configuration fragments into the default configuration for the RISC-V platform.
Assume our workspace is structured as below:
$ tree -L 2
.
├── aosp-kernel
│   ├── common
│   └── configs
└── riscv64-linux
    ├── llvm-project
    ├── qemu-5.1.0
    └── riscv-gnu-toolchain
First enter the configs repository and switch to android11-release
$ cd configs
$ git checkout android11-release
Then enter the common warehouse, clean it up first, then make sure to switch to the android-5.4-stable branch and then perform the merge configuration operation. After completion, you can compile directly. Note that the .config file will be automatically generated in the root directory of the kernel source code after running the script merge_config.sh, and I only merged the base configuration here.
$ cd common
$ make ARCH=riscv distclean
$ git checkout android-5.4-stable
$ ARCH=riscv scripts/kconfig/merge_config.sh arch/riscv/configs/defconfig ../configs/r/android-5.4/android-base.config
$ make ARCH=riscv CROSS_COMPILE=riscv64-unknown-linux-gnu- -j $(nproc)
3.3 Building a “Minimal System”
This part actually includes the production of the bionic libc static library plus toybox and mksh, all have been automated.
Download the source code first. After entering your working directory, execute the following command:
$ git clone https://github.com/aosp-riscv/port_bionic.git
$ cd port_bionic/
$ git checkout develop
$ git submodule init
$ git submodule update --progress
After downloading, you can make it, the steps are also very simple, run the following command in the port_bionic directory.
$ makeIf you want to make an img of the root file system, you can run the mkrootfs.sh script. Note that you’d better check the mkrootfs.sh script before running, adjust it yourself and make sure that the PATH_QEMU variable points to the correct QEMU installation directory, such as in section 3.1.3 above, that is /opt/qemu/bin. Then execute mkrootfs.sh with sudo permissions.
$ sudo ./mkrootfs.shThe content generated by the above steps is in the out directory:
$ tree -L 3 out
out
├── bin
│   ├── sh
│   ├── toybox
│   └── unstripped
│       ├── sh
│       └── toybox
├── lib
│   ├── crtbegin_static.o
│   ├── crtend.o
│   └── static
│       └── libc.a
├── obj
│   ├── xxx.o
│   ├── xxx.o.d
│   └── ......
└── rootfs.img
among them
libc.a: The static library of bionic’s libc,crtbegin_static.o: crtbegin provided by bionic for static linking,crtend.o: crtend provided by bionic for static linking,sh: Shell of Android, namely mksh.toybox: used to create out rootfs.rootfs.img: The smallest file system that can be used directly, including our toybox and mksh.
3.4 Launch the system
Execute the following command, remember to set the path of the kernel Image and rootfs.img to the correct location on your machine. My example here is as follows:
$ qemu-system-riscv64 -M virt -m 256M -nographic -kernel ../../../aosp-kernel/common/arch/riscv/boot/Image -drive file=out/rootfs.img,format=raw,id=hd0 -device virtio-blk-device,drive=hd0 -append "root=/dev/vda rw console=ttyS0"Finally, note that since the shutdown command has not yet been implemented, only Ctrl+A X can be used to poweroff the system, that is, press the Ctrl and A keys at the same time, and release and then press the X key to force QEMU to exit.
At present, the minimal system only provides very little functions. Although it is still very imperfect, it can be run after all, and it is definitely a “minimal Android system”. What’s more, it is also an Android running on the RISC-V architecture platform!